You know what one of my biggest design pet peeves is? When I'm designing something, but there's an unwanted background on the image I'm editing.
在本文中,您将学习如何完全删除照片背景或使其透明,因此图像假定您将其放置的任何其他背景的外观。
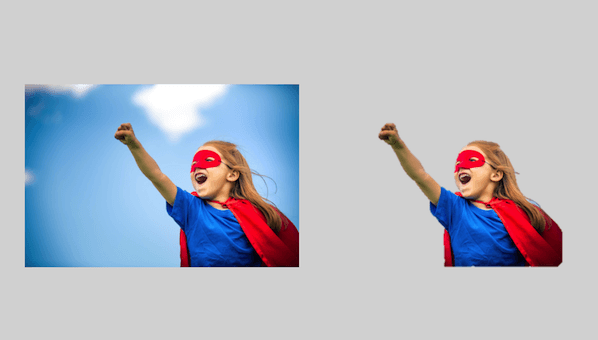
考虑以上功能图像。如果我只能删除那个讨厌的背景,那么左侧的图像对于我的呼声,幻灯片演示,博客文章或电子书将更加有用,以便看起来像右边的图像。

也许您已经下载了我们的另一本收藏free stock photosthat could also use a transparent background.
Luckily, thereissomething you can do about it. Using either Photoshop or PowerPoint, you can easily remove the background of your photo or image in no time. And I'm going to show you exactly how to do it.
First, grab an image to practice with.You can download one from our latest collection of royalty-free stock photo here...得到了您要删除其背景的图像吗?太好了 - 让我们开始。
Because some of you may not have Photoshop at your disposal, let's start with instructions for PowerPoint. You can alsojump down to the instructions for Photoshop here。
如何做一个Picture Background Transparent in PowerPoint
- 将图像插入PowerPoint。
- Click on your image. Then, under 'File' (on a PC) or 'Adjust' (on a Mac) in your toolbar, choose 'Remove Background.'
- PowerPoint will automatically try to remove the background, but it might not get it just right.
- 使用工具栏中的选项,单击以标记要保留或从最终裁剪图像中保留或删除的区域。
- Click somewhere outside of the image when you're finished.
- Save the image as a PNG file to preserve its transparent background.
How to Remove a Photo Background in PowerPoint
请记住,您需要使用Office 2010或以后使用,并且由于PowerPoint不像Photoshop那样复杂,因此可能对某些更困难的图像不起作用。但是,如果您无法访问Photoshop,这可能就是您所需要的。
1. Insert the image into PowerPoint.
图片with white/solid backgrounds or those that have high contrast with the foreground are the easiest to manipulate in PowerPoint.

2. First, click on your image. Then, under 'Picture Format' on a Mac (or 'File' on a PC) in your toolbar, choose 'Remove Background.'

3.PowerPoint will automatically try to remove the background, but it might not get it just right.

4. Using the options in the toolbar, click to mark areas you want to keep or remove from the final cropped image.
看看它是如何切断女孩躯干和上面斗篷的一部分?First, drag the box around the image so it includes the entire area of the image you want to keep.
Keep in mind that the areas highlighted in purple will ultimately be removed. Using your cursor, however, you can be even more precise about what you want eliminated. Hover over both the purple background and the subject in your picture -- you'll see your cursor produce either a plus sign or a minus sign. The minus sign, when hovering over your subject, allows you tomark areas to remove-- simply click on any additional areas you would like to remove.
If there are purple areas you actually want tokeep, hover over any purple spot and click to标记要保留的区域-- they will feature a plus sign.
To get a closer look at the areas you want to select, zoom in on your image. Below, you'll see small minus signs surrounding areas of the girl's hair -- I clicked on these spots where I thought PowerPoint might get confused as to which parts of the background between strands of hair should go or stay.

PowerPoint可以将这些头发束视为女孩的边缘,而不会去除头发和其余头部之间的背景。在这种情况下,这些负标志可以为您提供帮助。
If you happen to mistakenly include or exclude something, just click on the plus or minus sign that covers the area, and it will disappear.
5. Click somewhere outside of the image when you're finished.

最后但并非最不重要的一点是,将图像保存为PNG文件,以保留其透明背景。
如何做一个Background Transparent in Photoshop
Because Photoshop is much more sophisticated than PowerPoint, there are a few different methods you can use to make a background transparent. Each is good for a different kind of image. Click the links below to jump to the tutorial for each method:
- 多边形套索法is great for images with straight edges.
- The Quick Selection methodis good for images with round edges.
- The Brush method最适合其边缘需要更精确的图像。
多边形套索方法:对于具有直边的图像
Let's say I want to remove the blue background (as well as the pole) from this "stop spam" image.

Because this image is made up entirely of straight edges, this method of background removal is perfect. Here's how to make that blue background (and the silver pole) transparent.
1. Get your image ready in Photoshop.
The first thing you'll want to do after you drag and drop your image into Photoshop is convert it into a"Smart Object,"and then rasterize it. Here's how:
Click on theLayerPhotoshop菜单中的下拉菜单,突出显示智能对象, and then clickConvert to Smart Object。
接下来,单击Layerdropdown again, but this time, highlightRasterize, and then clickSmart Object。

Now you're ready to convert that pesky background into a transparent one.
2.放大图像,因此您可以更精确地删除背景。
您可以通过单击View下拉和选择放大orZoom Out,或使用所示的键盘快捷键。
3.选择波尔ygonal Lasso Tool from the toolbar on the left.
The Polygonal Lasso Tool looks like this:![]()
选择后,单击一个起点,然后跟踪您要继续使用一系列点击的图像的一部分。我更喜欢摆脱停车标志上的黑色边框,所以我在白色边框外边缘内部追踪标志。

4. Connect the line with your starting point.
Once you've made it all the way around your image, connect your line to the first point you started with. You'll know it's connected when your cursor includes a little circle, as shown below.

Once you connect your line to your first point, a flashing dashed line will form around your image, like so ...

5. Select the background you want to delete.
Do this by clicking the选择顶部菜单中的下拉菜单,然后单击Inverse。This will highlight the entire background you want to make transparent.

6. Delete the background.
Hit删除on your keyboard, and the background will turn into a checkered grid like you see below. This is how you'll know your background is now transparent.

7.将图像保存为PNG文件。
This will ensure your background transparency stays in tact.
The Quick Selection Method: For Images With Round or Wavy Edges
Okay, now let's say your image isn't as straight-edged as the image in the example above, and it's got some curve to it, like the image below. Here, you'll want to use the Quick Selection Tool.

1. Get your image ready in Photoshop.
就像我们使用多边形套索方法一样,将图像拖动到Photoshop之后,您要做的第一件事就是将其转换为“智能对象”,然后将其栅格化:
- Click on theLayerPhotoshop菜单中的下拉菜单,突出显示智能对象, and then clickConvert to Smart Object。
- 接下来,单击Layerdropdown again, but this time, highlightRasterize, and then clickSmart Object。(See step 1 within thePolygonal Lasso method tutorialfor screenshots if you're stuck.)
2.从左侧的工具栏中选择快速选择工具。
The Quick Selection Tool is right below the Polygonal Lasso Tool, and it looks like this:![]()
3.Click the background to highlight the part you want to make transparent.
This tool takes some getting used to, but once you get the hang of it, it's one of the fastest and easiest ways to remove the background from a photo.
Start clicking around on the background to highlight the parts you want to remove.

相应地调整选择工具的大小。我建议从更大的尺寸开始,因为这将使您一次选择较大的背景部分,从而加快该过程。

重复此过程,直到选择图像的整个背景:

4. Subtract selections as needed.
哎呀!假设您注意到要保留的图像的一部分正在与背景一起突出显示,就像您在下面的屏幕截图中看到的那样。

Have no fear -- you can subtract parts of the image that accidentally get highlighted:
First, click on theSubtract From Selectionbutton in the toolbar at the top. (Alternatively, you can hold downalt当您单击PC或optionwhile you click on a Mac.)

这也可能需要一些习惯,但是诀窍是将光标直接放置在您要保留的图像部分的内部边缘。您可能需要调整快速选择工具的大小,以获取一些更细节的细节。然后单击,以使错误突出显示的部分受到损害。
5. Delete the background.
Finally, click删除在键盘上使背景透明。

6. Save your image as a PNG file.
This will preserve the transparency of your background.
Pro Tip:Sometimes using the Quick Selection Tool results in jagged edges, especially on parts of the image where the edge should be a straight line. This tends to happen most on low-resolution images. If it happens to you, try smoothing out the jagged edges using thePolygonal Lasso methodafter first removing the background with the Quick Selection Tool.
刷子方法:对于更棘手的图像
There's a third method you can fall back on if the first two methods just aren't cutting it. This is great for images that need a little bit more precision, although to be honest, the first two methods usually do the trick for me.
The one time this method comes in handy for me is when I need to clean up some of the edges of images whose backgrounds were removed via the first two methods. For example, I used the Polygonal Lasso Tool in Photoshop to remove the background of the shark boy image at the very top of this article, but I cleaned up the spaces in between his fingers (which needed a little bit more precision) using the Brush Method.
1. Get your image ready in Photoshop.
Just like the first two methods, the first thing you need to do after you drag and drop your image into Photoshop is convert it into a "Smart Object," and then rasterize it:
- Click on theLayerPhotoshop菜单中的下拉菜单,突出显示智能对象, and then clickConvert to Smart Object。
- 接下来,单击Layerdropdown again, but this time, highlightRasterize, and then clickSmart Object。(See step 1 within thePolygonal Lasso method tutorialfor screenshots if you're stuck.)
2. Select the Brush Tool from the toolbar on the left.
The Brush Tool is right below the Red Eye Tool, and it looks like this:![]()
3.Change the "Mode" and "Hardness" of the Brush Tool.
就在顶部菜单下方,更改Mode到Clear。然后单击“笔刷大小”框旁边的下拉箭头,然后更改Hardness到100%。这实质上将使您的刷子工具变成橡皮擦。

4. Brush away the background.
通过单击和拖动擦除背景。调整刷子工具的尺寸,然后放大图像以获得更微调的精度。

5. Save your image as a PNG file.
Once you have your image the way you want it, save it as a PNG. This will preserve the transparency of your background.
就是这样!希望现在使用这些方法中的一种更容易删除图像背景。

Originally published Jun 14, 2018 10:26:00 PM, updated June 15 2018
主题:
图片Related Articles
![10 Facebook Cover Photo Size & Design Best Practices [Templates]](http://www.eigoj.com/hubfs/facebook%20cover%20photo%20size.jpg)

