
Creating a user-friendly website is about achieving the ideal balance between design aesthetics and functionality — you can't have one without the other.
In order to customize your website's design, you'll need to make changes to the style sheet file.Cascading Style Sheets (CSS)is the coding language used to affect the design of the website.
You canuse CSS to add animations to your site,solve interface challenges, and otherwise delight your visitors. Building a great user experience isn't always this glamorous, but every aspect of web design is important — even something as seemingly unimportant as the proper spacing between elements.
Thus, an important aspect of website customization involves using CSS padding to give various website elements room to breathe.

What is padding in CSS?
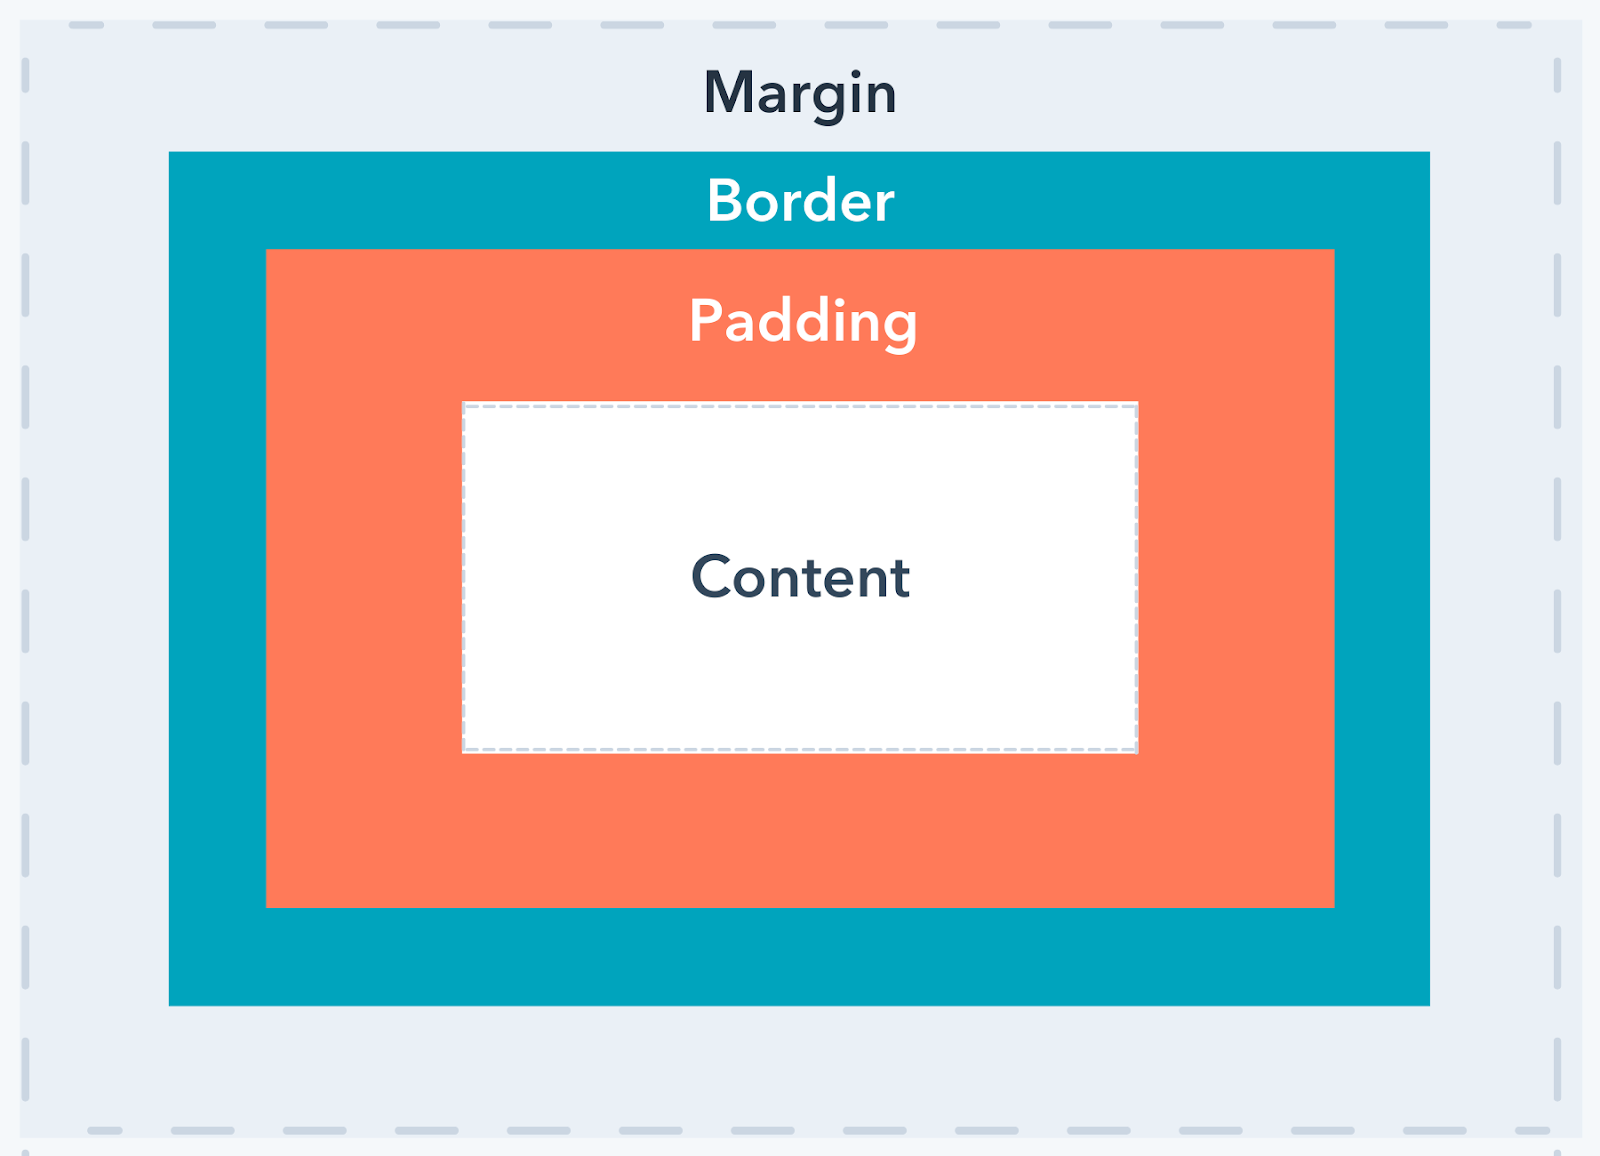
The CSS padding property is used to create space around an element but within its border. Padding is the innermost part of the CSS box model that affects the spacing of an element. In addition to padding, the CSS box model also involves the element's margin and border styles.
Hypertext Markup Language (HTML)is the coding language used to define elements on a page. CSS gives you full control over all aspects of an element's style, and in this case, padding. They both contribute to the look and functionality of a website.
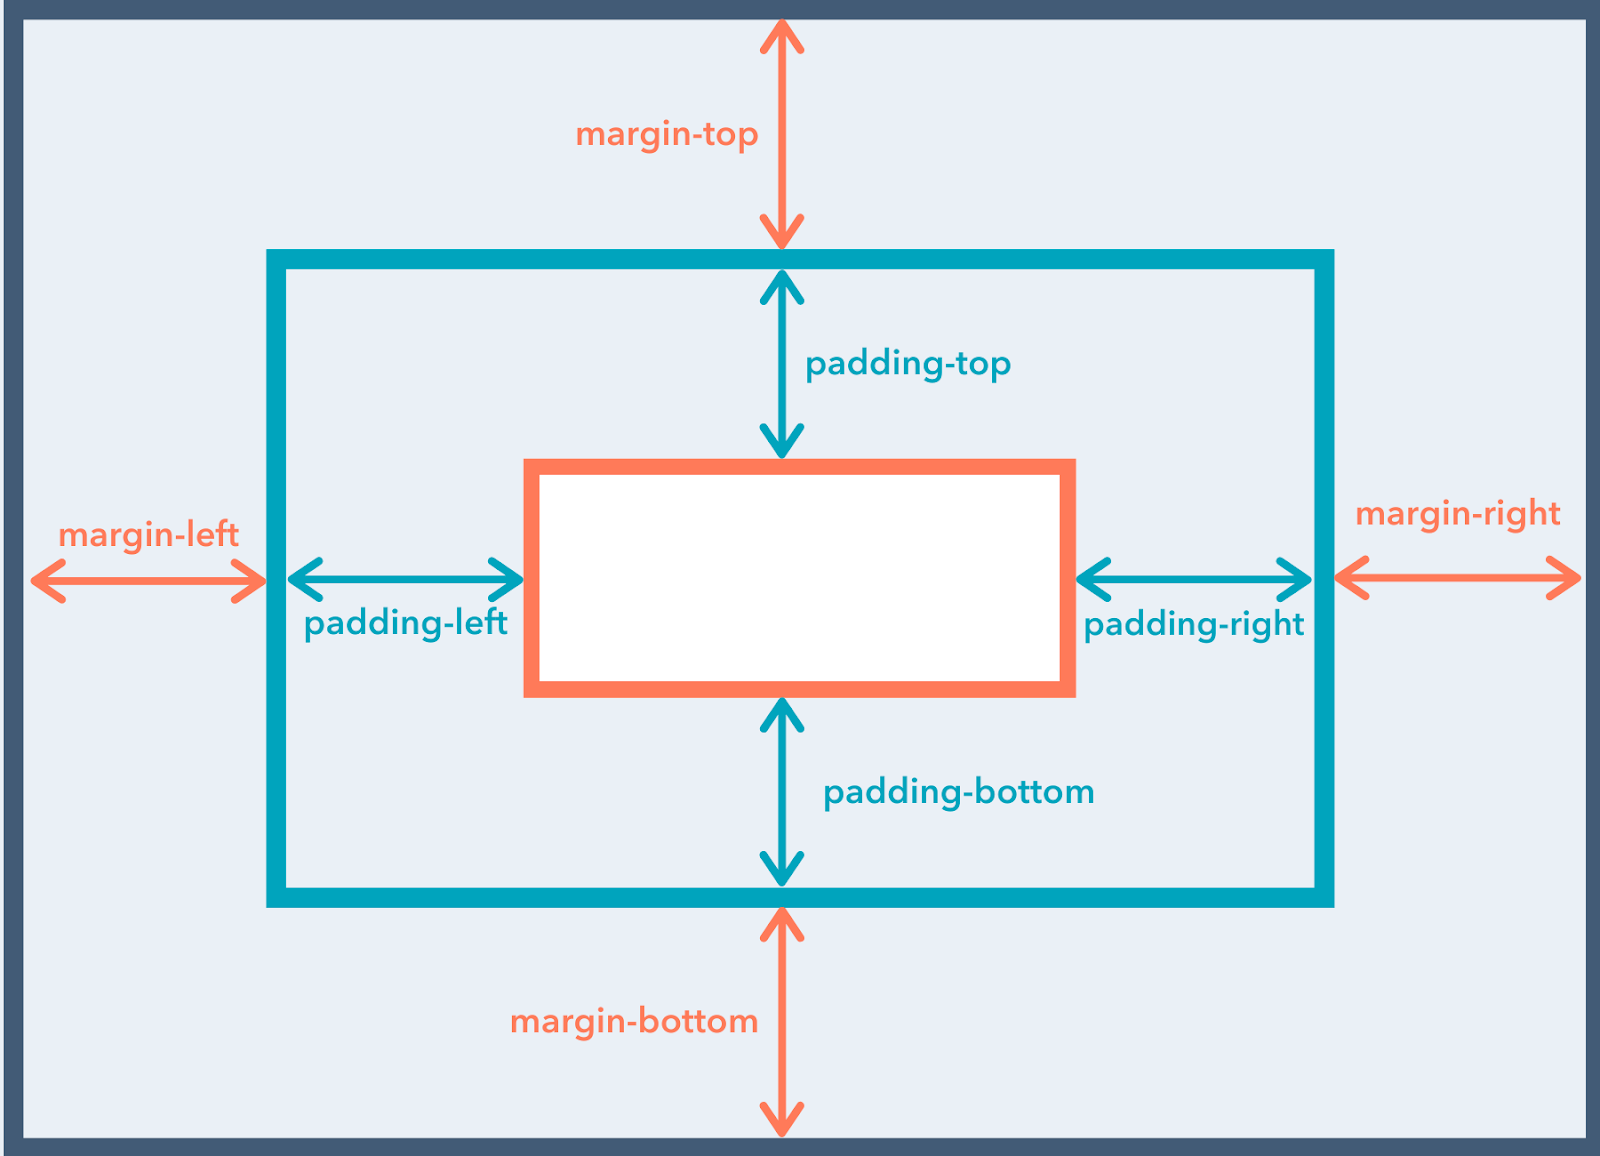
In terms of CSS, you can set the padding around each side of an element — top, right, bottom, left — using lengths or percentages. These values are all positive, starting from zero and increasing from there. Negative values are not possible with the padding property in CSS.
The default value of all padding properties is 0, which means that any elements that can be changed with CSS start with no extra spacing. In order for space to be added within an element, you’ll want to add padding.
Here's how padding properties are specified for each side of an element:
- padding-top: [amount];
- padding-right: [amount];
- padding-bottom: [amount];
- padding-left: [amount];
Spacing values — that is, how much padding you want to add — can take on three different forms:
- Lengthin px, pt, cm, etc.
- Percentage(%).
- Inherit— this specifies that the CSS padding property should be inherited from the parent element.
Here's a visual explanation of the CSS box model:
And here's a diagram of the various padding properties for reference:
CSS Padding Shorthand
Like most CSS properties that need to be repeated often, there is ashorthand methodfor applying CSS padding.
The long-form method involves applying padding to each side of the element, individually:
- padding-top
- padding-right
- padding-bottom
- padding-left
In other words, defining long-form CSS padding means alotof extra lines of code which can bloat your site, causing it to become slower over time.
This long-form system gets the job done, but it isn't efficient for the performance of your site. The shorthand version can save quite a bit of time if you have a lot of elements on your website. Shorthand gives you the ability to define one, several, or all aspects of padding within just a single line of code.
Here's how shorthand CSS padding works:
In a situation where you provide only one padding value, it is assumed that all four sides of the element should be padded at that value, such as:
padding: 10px;
If you provide two padding values, the first one is understood as the top and bottom padding and the second as the left and right padding, such as:
padding: 2px 4px;
If you provide three values, the first one corresponds to top padding, the second value is for both left and right padding, and the third one refers to the bottom padding, such as:
padding: 15px 10px 15px;
Finally, if there are four values present, they represent, in order, top, right, bottom, and left padding:
padding: 15px 10px 15px 10px;
While the long-form method might seem easier to recall, because it's so straightforward, it helps to understand the directional relevance of the shorthand version. Specifically, when you're defining four values, they match up with the top of an element then clockwise, according to the order in which they're written in CSS.
Text Padding CSS
It's hard to read large blocks of text without decent spacing. In fact, it's so overwhelming that it might make someone leave the website they're browsing.
Text padding adds space between lines of text which contributes to a positive reading experience. Done well, text padding is hardly noticeable, which is ideal – you want your visitors to focus on your content andcalls-to-action, not the space between text elements.
With text padding, you’ll set the values for the right and left sides of the element or use one padding value if you want all sides of your text element to be uniform.
p {
border: 3px solid #00A4BD;
text-align: center;
padding: 35px;
}

Button Padding CSS
Buttons are usually the element used for calls-to-action, so padding them appropriately makes them stand out just enough for a user to click. Similarly to the way you would add padding to a text element, the same process can be done for a button.
.padded {
color: #2D3E50;
border: 2px solid #00A4BD;
padding: 5px 20px;
}
.not {
color: #2D3E50;
border: 2px solid #00A4BD;
}

Image Padding CSS
You can add padding to create space between your images, text, and other content, which helps prevent your website from looking cluttered.
An image without the proper amount of padding will look something like this:

We can assume that the padding around the image was left at the default setting of 0.
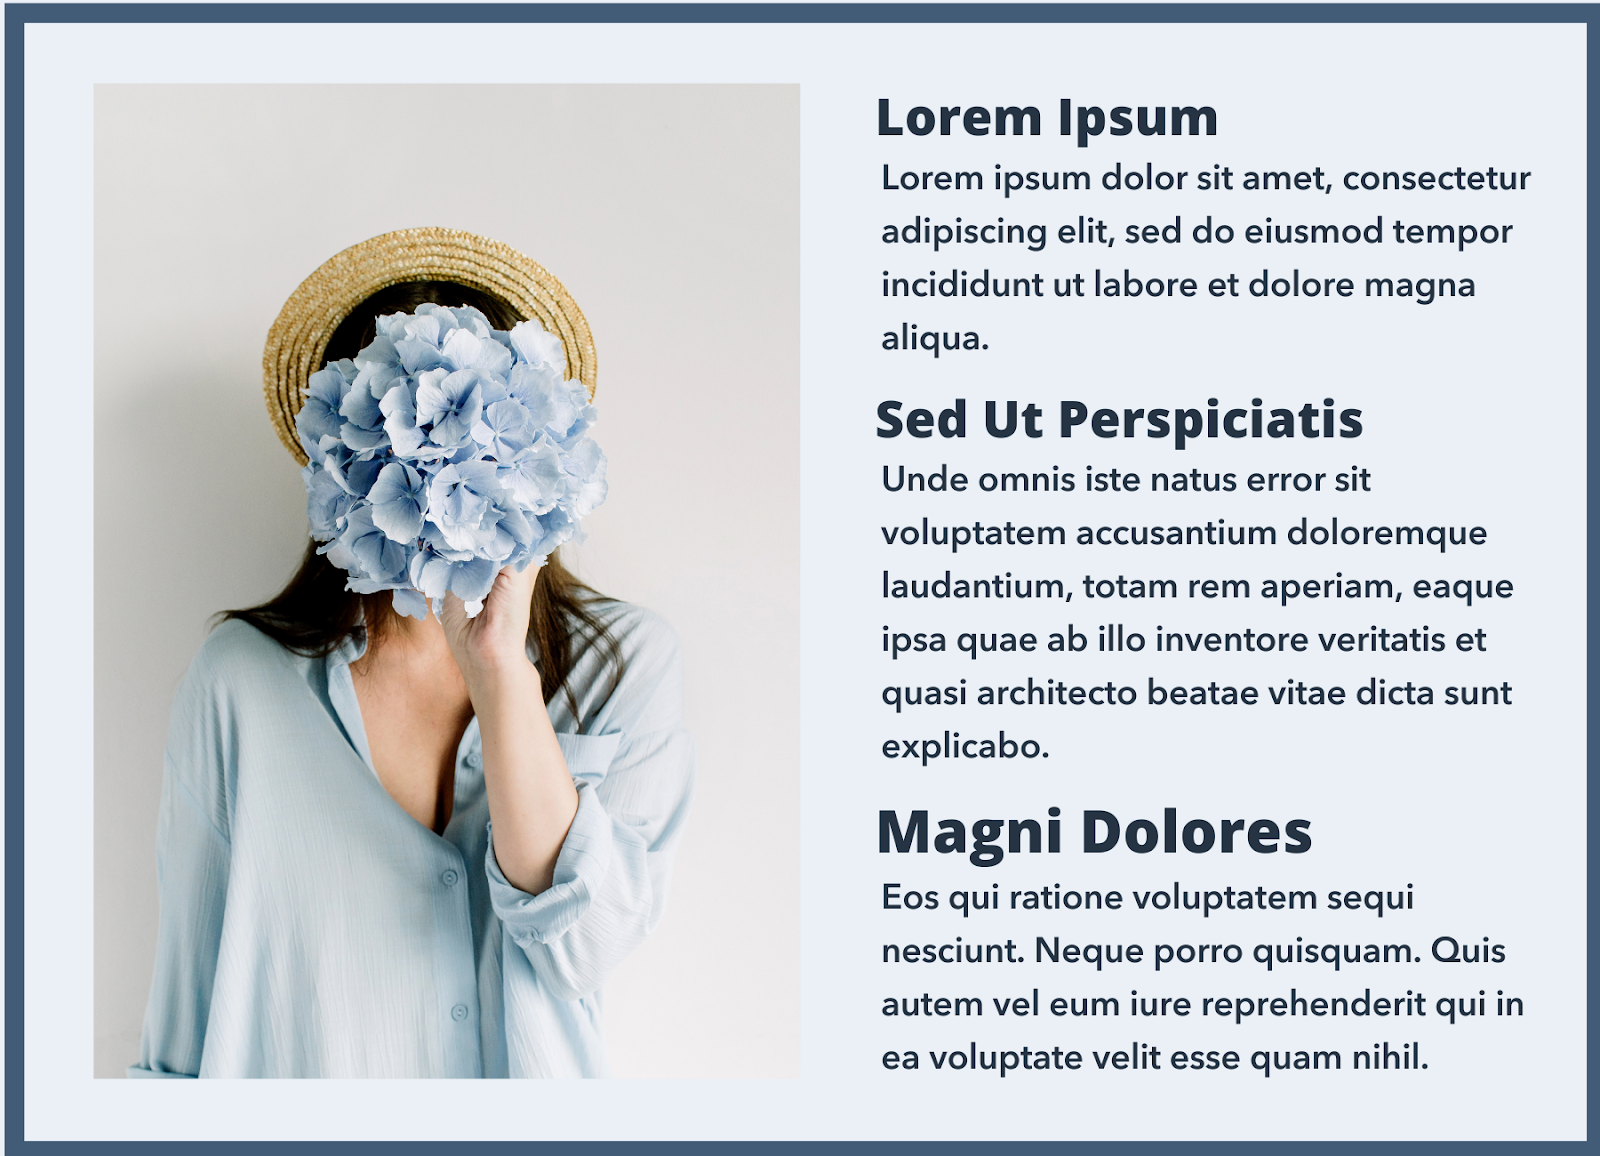
As you can see below, the page looks significantly less compact when padding is added around the image. It creates enough space for the elements to look comfortable, not cluttered, on the page.
To add CSS padding to all images, locate the image element in your website's style sheet —img. Then, add in your desired value for padding. In the code example below, we’ll set the padding to 20px.
img {
padding: 20px;
}
Padding Color CSS
To add color to CSS padding, you can use thebackground-clippropertyand thebox-shadow property.
Background-clip Property
The background-clip function allows you to define how far the background extends into the element.
It's possible to set the color so that the background extends to the outer edge of the border.
#example1 {
border: 3px dashed #00A4BD;
padding: 15px;
background: #EAF0F6;
background-clip: border-box;
}
 You can also set the color to stop on the inside of the border.
#example2 {
border: 3px dashed #00A4BD;
padding: 15px;
background: #EAF0F6;
background-clip: padding-box;
}

Another option is to create empty space between the background and the border, as shown below.
#example3 {
border: 3px dashed #00A4BD;
padding: 15px;
background: #EAF0F6;
background-clip: content-box;
}

Box-shadow Property
The first three zeros define h-shadow (horizontal shadow), v-shadow (vertical-shadow), and blur. For the property to work, each of these items must have a value — even if that value iszero.
The last value — 15px — is the value for the solid shadow, which extends inward to meet the content box. The value of the shadow must be the same as the padding.
#example4 {
border: 3px dashed #00A4BD;
padding: 15px;
background: #EAF0F6;
background-clip: content-box;
不必:插图15 0 0 0 px # FF7A59;
}
 You can achieve a similar effect to the box-shadow property by using the linear-gradient property. The two linear-gradient values can be set for the background, defining the content-box and padding-box, respectively.
#example5 {
border: 3px dashed #00A4BD;
padding: 15px;
background-clip: content-box, padding-box;
background-image:linear-gradient(#FFFFFF, #F5C26B), linear-gradient(#FEC3B4, #FF8C6F, #FF7A59);
}

CSS Negative Padding
Negative numbers don't work when specifying CSS padding because they go against the purpose of this aspect of CSS. In the textile industry, the word "padding" refers to the lining or filling that's stuffed inside a material. This is the same scenario for CSS padding properties.

At the default padding of 0, the content's edge is the same as the border edge.
p {
border: 3px solid #00A4BD;
background - color: #电弧炉0F6;
padding: 0;
}
This is how the resulting element would appear in a browser:
 The content would overlap with the borders if it was possible to set the padding to a negative number. Assuming it was possible to use a negative value, you would write something like this:
.example {
padding: -20px 0 0 0;
border: 3px solid #00A4BD;
}
And this is how the resulting element would appear in a browser:

Apply CSS Padding Around Your Website's Elements
Don't underestimate the importance of padding around text and image elements on your website. Even the smallest changes can significantly improve your website's aesthetic and user experience. However, with a solid understanding of CSS, you'll be able to ensure that your website will look and function exactly the way you want it to.
Editor's note: This post was originally published in February 2020 and has been updated for comprehensiveness.


Originally published Feb 19, 2021 7:00:00 AM, updated July 28 2021
Topics:
Bootstrap & CSSRelated Articles

![How to Create Scrolling Text With CSS [+ Code Templates]](http://www.eigoj.com/hubfs/Google%20Drive%20Integration/scrolling%20text%20css.jpeg)
